

Kool Aid Dyeing Knitting Yarn Tutorial
Below are the Step-by-Step instructions with photos that I used to actually dye test swatches and several full skeins of yarn. Follow this great kool aid dyeing knitting pattern to create some fabulous and color full yarn.
Preparing the knitting yarn and kool aid

I scoured all the grocers in my area to find as many colors of KoolAid as possible for the test swatches.

In a casserole dish with a squirt of dish soap, my test mini-skeins bathed for 30 minutes until thoroughly soaked in lukewarm water.
Remember: Keep your skin protected with a pair of latex gloves. And cover your work surfaces to protect against staining. We covered the kitchen table with black plastic bags.
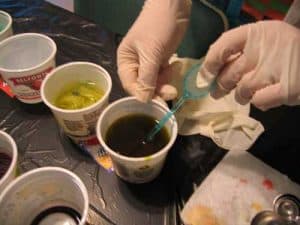
Combine 1/2c. water to one packet of KoolAid and stir until smooth.
Use the proper tool for the job. The tennis racket cocktail stirrer served multiple uses. The stick-end was used to stir up the KoolAid dye mixtures and the racket-end was great for scooping the test mini-skeins out of the hot water.

In the back of our pantry, we discovered some Latin-centric drink mixes that we decided to try out. The name brand was Aquas Frescas and the flavors are Tamarindo and Guayaba. The Tamarindo looks almost like iced tea and the Guayaba was a milky peachy-pink.
(For the record, the Guayaba smelled fantastic! Tart and fruity!)
Making Color Test Swatches
I put each test skein of yarn into a glass and filled with lukewarm water until covered. Then I added 2-1/2 tsps of my KoolAid mixture and gently squashed the yarn down with the racket-end of my cocktail stirrer.
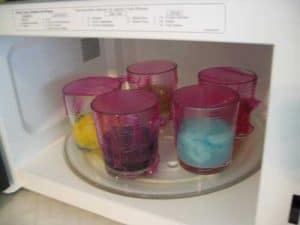
tried microwaving several cups at once but found that my results were quicker with one or two glasses in the microwave at a time. With one or two at a time, 2minutes on high was usually enough to steam the color into the yarn.
(Dig the purple plastic wrap!)

I started running out of glasses, so I put a few test mini-skeins into very small juice glasses. The plastic wrap over the top popped off and some of the yarn decided to make a run for it.

Bob holds a sample of cooled yarn. Its still floating in the original liquid and the water really is clear after the yarn has been “baked” with the dye.

In an effort to keep everything organized, we lined up the dye mix cups and the finished dye swatches on top of the KoolAid envelope so we wouldn’t get Strawberry mixed up with Cherry or Tropical Punch.
The top cup in each set is the yarn cooling and the bottom cup is the dye mixture (some are empty because we used all the dye mixture). After microwaving each yarn swatch in a glass, microwave-safe container, I transferred them into a plastic cup to cool (since I don’t have enough glass for 18+ cooling yarn swatches).
Once cooled completely, I ran tepid (not warm and not cold) water over the yarn to rinse, then I squeezed out the excess moisture and hung to dry.
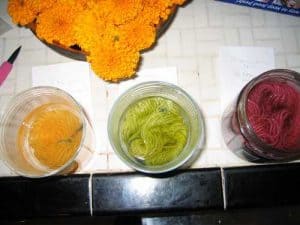
From left to right:
Marigold orange created by mixing equal parts Pina-Pineapple and Orange
Celery green yarn was created using large doses of Switchin’ Secret.
Red plum created using equal parts Grape Berry Splash and Roarin’ Raspberry Cranberry.
Dyeing Full Knitting Skeins
I put about a half a skein of KnitPicks “color your own” merino wool sock yarn into a large casserole dish (after soaking it for 30 minutes in the recommended water and soap bath).
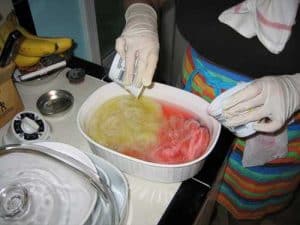
I dropped the yarn into the dish and covered with water then I gently poured dye from the mixture cups. For this combination, I used mostly Pink Lemonade, Orange and Lemonade with a little bit of Tropical Punch on the far left edge and a bit of Pina-Pineapple on the far right.

I stuck it in the microwave for 3-5 minutes intervals until the water was clear (probably 15 minutes or so total but I let it sit covered for a few minutes in between each bake cycle). Notice how all the water is clear. The yarn has absorbed all the color!

I named this colorway Creme Savers after those creamy Lifesavers but some of the color is more vibrant than a Lifesaver. Bob thinks it should have been called “Rose Garden” instead. Either way, I think this was a hugely successful experiment.
In the end, this yarn was turned into footlets.
Stovetop Method
Using the long skein I wound around two chairs last night, I squashed a third of the skein into each of three jars. Each jar had been filled with about a third of the way with water to keep them weighted down in the large pot filled with water.
I slowly poured the pre-mixed KoolAid mixtures into each jar and squished it around gently with a chopstick. I used Changin’ Cherry, Ice Blue Raspberry Lemonade and Grape.

NOTE: At this point, all the water is room temperature!
Once I had gotten the color mixed into the yarn, I turned the stove to medium. After 20 minutes or so, I thought the color looked a little dull and it hadn’t really wicked completely so I was owrried I would get stripes of undyed yarn where they stuck out of the jars. So, I gently ladled more color into each jar and gently drizzled some color on the yarn sticking out of the yarns.
I let the yarn sit for about 45 minutes to an hour until it looked like all the color had been absorbed. Then I turned the burner off and let the whole mess cool.

This is the finished full skein from the 3-spaghetti jar experiment. The primary colors used were a double dose of Ice Blue Raspberry Lemonade, a single dose of Changin’ Cherry (which is actually a turquoise color despite the name to the contrary) and a mixture of Grape with a few drizzles of Grape Berry Splash.
The finished swatches

Here’s all the color swatches. They’re still wet and I’m taking them down to the basement to hang dry (I would have taken them outside to dry in the sun but it’s been raining like a beast all day.)

The top sample is the original control sample and the bottom yarn swatch is a “super dose”. Its about two shades darker than the original and I suspect that adding more KoolAid dye to the yarn would produce an even more brilliant olive-y green.
To show how mixing colors works, these are the original formula swatches with a new blended color.

From top to bottom: Grape Berry Splash, Equal parts Grape Berry Splash and Roarin’ Raspberry Cranberry, Roarin’ Raspberry Cranberry
I wanted to see if I could make the rather acidic colors more usable by mixing them. The middle color is half and half color mix of the surrounding colors

From top to bottom: Orange, Equal parts Orange and Pina-Pineapple, Pina-Pineapple

This was about a half a skein (220 yards) of sock yarn in a casserole dish (see earlier photos for the dyeing technique).