

Crossword Bag Free Knitting Pattern
One day when I was working on a crossword it suddenly hit me that the grid makes a perfect and simple knitting pattern! This could be used for a lot of different things, but I decided to have a go at a bag first of all.
The basic technique is to use a crossword grid as a knitting pattern – choose a standard number of stitches per white square. Knit a front and a back piece. Knit a gusset strip. Sew them together, add a lining, and handles, and that’s all there is to it! I’ve written out the instructions in detail as well 🙂
I hope you enjoy making this bag! I’d love to see photos of what you’ve made – there will be a Projects Gallery soon, to show off your creations!
Cheers, by Denise Sutherland
A Slightly Tricky Knit: experience with stranded knitting and sewing is needed.
Materials
- 2 x 50g balls of black 5 ply wool crepe
- 1 x 50g ball of white 5 ply wool crepe
- I used Paton’s Bluebell, but any other smooth 5 ply yarn would be fine.
It’s a good idea to choose a yarn that can be washed easily.
- 3 mm / US 2.5 needles; straights or circular
- Handles of your choice. I used white vinyl ones from Tall Poppy Crafts.
- Darning needle
For the lining: Sturdy washable lining fabric (about 60 cm), sewing machine, snaps, strip of wide flat elastic, thread, hand sewing needle etc
Gauge
About 30 stitches: 10 cm / 4″ – but it’s not too important (isn’t that nice for a change?).
Size
About 24 cm wide x 24 cm high x 8 cm deep (9″ x 9″ x 3″)
Free Knitting Pattern Note Before Casting
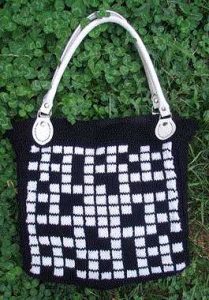
You can convert any 13×13 or 11×11 crossword into a knitting pattern. For a 13×13 grid simply use 4 stitches and 4 rows per white box, and for an 11×11 grid use 5 stitches & 5 rows per white box. The black lines are all single stitches and single rows.
- Choose one of the two grids (British Crossword or American Crossword). Knit the crossword pattern, and then knit the top black border as high as it needs to be to accommodate any tags for bag handles, if that’s the sort of handles you’ve got. They are 70 or 71 stitches wide respectively (in the final fit, 1 stitch difference doesn’t matter).
- Knit the front piece from the grid of your choice. Then knit a second piece for the back of the bag, again choosing the grid of your choice (two the same, or two different – it’s up to you!). Make sure you add the extra rows at the top to accommodate the bag handle tabs.
- Wash and block your knitted crosswords, pinning out carefully. This will help ease out any lumps in the stranded knitting. (Photo 1)
Knit the gusset piece – cast on 20 stitches, knit in garter stitch until piece fits around the side, base, and other side of your knitted crossword pieces (~ 62 cm / 24.5″). - Sew the gusset to the crossword front and back pieces, along the sides and bottom edges.
- If the bag isn’t tall enough to cope with your chosen handles, you can pick up stitches along the top of the bag and knit upwards for another 15-20 rows, as required. This is handy if you purchase your bag handles after knitting the crosswords, and need to adjust things after the fact. (Photo 5).
- Darn in all ends.
Sew the lining
- Using the bag as a guide, cut out a front, back and gusset pieces from the lining fabric of your choice. A darker fabric is probably better as it won’t show the stranded side of your knitting through the fabric. Leave a good 3cm / 1″ seam allowance, or more.
- Sew inner pockets etc to the front and back pieces, stitching them onto the right side of the fabric. A pocket can be made from a hemmed rectangle, with a snap closure if desired. (Photo 6).
- I added a wide strap of elastic onto one piece of the lining, which was stitched down at intervals to make handy slots for holding pens / DPNs / sunglasses etc. (Photo 7)
- Sew the fabric gusset to the front of the lining, and then sew it onto the back of the lining, ensuring the seams are on the outside of the lining, and the inside of the bag looks right! Keep checking the fit all the time, keep trying the lining inside the knitted bag to check your measurements, then pin and sew accordingly.
- Fit the lining inside the bag and fold the top edge to the inside so it meets the top edge of the knitted bag, pin hem (just the cloth, not the knitted bag). Remove lining, iron hem down, stitch. (Photo 8).
- If you wish to have some plastic or cardboard base or sides inside the bag, now’s the time to decide. Cut the material you choose (I used the base of a green shopping bag) to size, and fit in place (Photo 9).
- Pin the lining into the bag, hand sew the top edge first. Then pin along the side seams (to affix the knitted bag and lining together, and hold the side/base pieces in place if used), and hand sew in place. Nearly done!
- Sew on the handles firmly. Add a handbag clasp if so desired.
- You might like to add a little pencil button, or embroider letters into the grid, such as your name, or some message… there are lots of options, go crazy!
- Go and show off your bag to all and sundry!
© Denise Sutherland. For personal use only.


