Saturday, February 22, 2025

Pennys Felted Bag Free Knitting Pattern

Pennys Felted Bag Free Knitting Pattern

This little felted handbag is knitted in gorgeous Colinette Skye yarn, lined with fabric &
decorated with little fabric flowers. It’s easy to knit – techniques used are knitting in the round, increasing and decreasing, picking up sts & grafting.

SIZE
One size, small handbag – big enough for a wallet and phone and lipstick!

MATERIALS

  • Colinette Skye [100% Wool; 183m/100g hank] 2 hanks in colour Honolulu
  • 6.5mm, 60cm long circular needle
  • 4 sts markers
  • 2 stitch holders
  • Tapestry needle
  • Lining fabric (I used Kaffe Fassett fabric)
  • Tulle for flowers
  • Matching sewing thread

GAUGE
12 sts/18 rows = 4 inches in stockinette st – this is unfelted gauge

Pennys Felted Bag Free Knitting Pattern Instruction

The base of the bag (worked back and forth in rows):
Cast on 35 sts using 2 strands of yarn held together
Work 20 rows of garter st (knit every row)

Main section (worked in the round):
Now working with 1 strand of yarn, place marker, pick up and knit 20 sts along one edge, place marker, pick up and knit 35 sts along next edge, place marker, pick up and knit 20 sts along final edge, place marker, k35, 110 sts

Work in the round in st st until work measures 24 cm
Next round: k20, cast off next 35 sts, k55, place next 20 sts on a holder, turn and work flat
from now on

Next row: p35 place next 20 sts on a holder
Work in st st on these 35 sts until flap measures 27 cm, ending with a purl row
Dec 1 st at each end of the next 4 rows
Cast off rem 27 sts

Place sts from one holder on needle
Working flat in st st, dec 1 st at each end of next 6 rows, 8 sts
Work in garter st until strap measures desired length, or until only a few yards of yarn remain, ending with a WS row

Working in st st, inc 1 st at each end of next 6 rows, 20 sts
Graft these sts to the 20 sts on the other holder, taking care not to twist the strap

FINISHING

Felt the bag in a washing machine at 60°C, putting some jeans in the wash for added agitation if desired.

To line the bag cut 2 pieces the same shape as a bag with an extra 1.5 cm for seam allowance and an extra 2 cm at the top.

Stitch the 2 pieces together along all edges except the top edge, fold top edge over and stitch down, and then slip stitch lining into the bag.

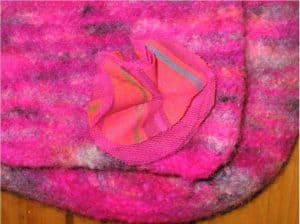
For flowers, cut 2 circles from fabric and 2 from netting for each flower.
Layer the circles, secure together with in the center, then work a circle of running stitch around the center of the fabric circles, about 1cm from the center.

Pull the thread tightly, which pulls the circles into a flower shape, and stitch these to the bag, making extra small stitches into the fabric to secure the flower shape.

Related Knitting Articles

Creating Patterns In Knitting With Many Colors

Creating patterns in knitting with many colors is an art that transforms simple yarn into vibrant masterpieces. By selecting harmonious yarn colors, knitters can create stunning temperature blankets or intricate designs. Techniques like stranded and intarsia knitting add texture and depth, turning each stitch into part of a colorful narrative. Whether crafting a blanket or a scarf, the right combination of colors will ensure your project is both meaningful and eye-catching.

Entrelac Cardigan Knitting Patterns

The text you provided is a comprehensive guide to knitting an entrelac cardigan. It covers various aspects, including different patterns like honeycomb and diamond, the materials needed for entrelac knitting, and detailed steps for knitting an entrelac cardigan. Here's a brief summary highlighting the main points: 1. **Patterns and Techniques**: - The honeycomb pattern uses interlocking hexagonal blocks for a textured design, while the diamond pattern uses sharp angles for a sophisticated look. - Entrelac knitting involves creating a woven appearance by knitting small blocks in a diagonal arrangement. 2. **Materials**: - Essential materials include wool or cotton yarn, circular knitting needles, stitch markers, a tapestry needle, scissors, and a measuring tape. - The weight of the yarn affects the final result, with options like bulky, sport, fingering, and DK weight recommended. 3. **Knitting Process**: - Start by casting on stitches using a method like long-tail or cable cast-on. - Knit base and side triangles to form the structure, ensuring consistent tension and stitch count. - Pick up stitches along edges to continue building tiers, repeating until the desired length is reached. - Knit sleeves and sew all pieces together using techniques like the mattress stitch for a polished finish. 4. **Reading Patterns**: - Understanding common abbreviations and instructions is key to navigating entrelac patterns. - Pay attention to stitch counts, special techniques, and the overall flow of the pattern. 5. **Finishing Touches**: - Ensure all seams are secure and weave in loose ends. - Block the finished piece to improve its shape and drape. The guide emphasizes the importance of practice and patience, encouraging knitters to enjoy the creative journey of making a unique entrelac cardigan.

Dale Of Norway Knitting Patterns Free

Discover the enchanting world of Dale Of Norway Knitting Patterns Free, where tradition meets modernity. With over 140 years of craftsmanship, these patterns transform wool into wearable art. Whether you're a beginner or a seasoned knitter, accessing these treasures online is a breeze. From the iconic Peace sweater to the stunning Dale Garn designs, each pattern invites you to weave a piece of Norwegian heritage into your creations. Happy knitting!

LEAVE A REPLY

Please enter your comment!
Please enter your name here

Stay Connected

0FansLike
0FollowersFollow
0FollowersFollow

More Free Knitting Patterns