

Striped Coat For Dog Knitting Pattern
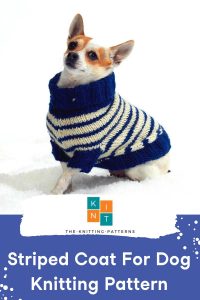
You have knitted enough knitting sweaters for you or your family. It’s time for this striped coat for dog knitting pattern to be your next knitted project! Knit a sweater for your lovely dog! With easy-to-follow instructions, you can make a cozy and warm knitted coat for your dog. Made with yarn special for keeping our furred friends comfy and hot!
Knitting Patterns Materials
- Knitting Needle Size8 or 5 mm, Circular Knitting Needles, Double-Pointed Knitting Needles (DPNs)
- Yarn Weight(4) Medium Weight/Worsted Weight and Aran (16-20 stitches to 4 inches)
- Red Heart® Heat Wave™ (3.5 oz/100 g; 198 yds/181 m) Sizes S (M, L, XL)
- Contrast A: Ocean (0888) – 1 (1, 2, 3) ball(s)
- Contrast B: Sandy Shores (0110) – 1 (1, 2, 3) ball(s)
- Set of 4 size U.S. 8 (5 mm) double-pointed knitting needles.
- Size U.S. 8 (5 mm) circular knitting needle 16″ [40.5 cedimeteres] long or size needed to obtain gauge.
- 2 stitch holders.
- Stitch marker.
Gauge18 stitches and 24 rows = 4″ [10 cedimeteres] in stocking stitch .
Striped Coat For Dog Knitting Pattern Instructions
SIZES
To fit dog chest measurement:
S: 12″ [30.5 cedimeteres]
M: 15″ [38 cedimeteres]
L: 18″ [45.5 cedimeteres]
XL: 22″ [56 cedimeteres]
Transfer stitches from double-pointed needles to circular needle when necessary.
Stripe Pat
With B, work 4 rows.
With A, work 2 rows.
These 6 rows form Stripe Pat.
Collar:
With double-pointed needles and A, cast on 44 (56-68-80) stitches. Divide stitches onto 3 needles. Join in round, placing marker on first stitch .
1st round: With A, *Knit 2. Purl 2. Repeat from * around.
Repeat 1st round for 4 (4½-5-6)” [10 (11.5-12.5-15) cedimeteres].
Break A. Join B.
Next round: With B, *Knit 11 (14-17-20). Make 1. Repeat from * to around. 48 (60-72-84) stitches.
First row of Stripe Pat is now in position. Keeping continue of Stripe Pat, proceed as follows:
Body:
1st and 2nd rounds: Knit.
3rd round: Knit 1. Make 1. Knit to last stitch . Make 1. Knit 1. 50 (62-74-86) stitches.
Repeat these 3 rounds 4 (5-6-10) times more. 58 (72-86-106) stitches.
Knit 4 (6-6-10) rounds even.
Leg Openings:
Keeping continue of Stripe Pat, proceed as follows:
1st round: Knit 5 (8-10-12). Cast off 7 (9-10-12) stitches loosely. Knit to last 12 (17-20-24) stitches. Cast off 7 (9-10-12) stitches loosely. Knit to end of round.
2nd round: Knit, casting on 7 (9-10-12) over cast off stitches.
Knit even until work from last round of ribbing measures 5 (7-9-12)”[12.5 (18-23-30.5) cedimeteres].
Back Shaping:
Keeping continue of Stripe Pat, proceed as follows:
1st round: Knit to last 6 (8-12-16) stitches. Place last 6 (8-12-16) stitches and first 6 (8-12-16) stitches of next round onto stitch holder. 46 (56-62-74) stitches.
Working back and forth across needles in rows, and keeping continue of Stripe Pat, proceed as follows:
1st row: Purl.
2nd row: (Right Side). Knit 2. slip 2 stitches as if to knit, then knit those 2 stitches together. Knit to last 4 stitches. Knit two together. Knit 2. 44 (54-60-72) stitches.
3rd row: Purl. Repeat last 2 rows 3 (4-4-8) times more. 38 (46-52-56) stitches.
Repeat last 2 rows 3 (4-4-8) times more. 38 (46-52-56) stitches.
1st row: (RS). Knit 2. slip 2 stitches as if to knit, then knit those 2 stitches together. Knit to last 4 stitches. Knit two together. Knit 2. 36 (44-50-54) stitches.
2nd row: Purl 2.Purl two together. Purl to last 4 stitches. Purl two together. Purl 2. 34 (42-48-52) stitches.
Repeat last 2 rows 4 (5-6-6) times more. 18 (22-24-28) stitches. Leave stitches on needle.
Ribbing:
With Right Side facing and A, pick up and knit 15 (19-22-28) stitches along right edge of Coat.
Knit 12 (16-24-32) from stitch holder.
Pick up and knit 15 (19-22-28) stitches along left edge of Coat.
Knit rem 18 (22-24-28) stitches on needle.
Join in round, placing marker on first stitch . 60 (76-92-116) stitches.
1st round: *Knit 2. Purl 2. Repeat from *around. Repeat last round 9 (12-14-18) timesmore. Cast off in ribbing.
Leg Edgings:
With Right Side facing, A and double-pointed needles, pick up and knit 16 (20-24-28) stitches evenly around leg opening. Divide stitches onto 3 needles. Join in round, placing marker on first stitch.
1st round: *Knit 2. Purl 2. Repeat from * around. Repeat last round for 1½ (2-2-3)” [4 (5-5-7.5) cedimeteres]. Cast off in ribbing.